So, I have a MacBook. Never owned a Mac before. There are two reasons why I now have one. The reason I like to give is that it will make development for iOS and the cloud easier than a Windows machine. The real reason is that I had a lot of Autodesk applause points to spend before I retired.
Autodesk, like many large companies, has a system for giving ad hoc rewards to employees. At Autodesk you get applause points which need to be spent in the applause store. Seemed like a great opportunity to replace the Windows laptop, dock, monitors, mouse and keyboard that I needed to return to Autodesk. The applause store (at least the UK version) has an eclectic mix of stuff. Lots of homeware and gadgets. There’s a great selection of all things Apple and complete junk for anything Windows related. Which is why I ended up exchanging my points for a MacBook Air, an iPhone mini, AirPods and a set of 6 Le Creuset mini-ramekins.
Naturally a Macbook from the UK version of the applause store comes with Apple’s British keyboard layout. Which is weird if you’re used to a standard (Windows) British keyboard layout.
Standard Layout

Apple Layout

The backslash1 key has moved across the keyboard to where # ~ used to be. ~ joins grave2 back where backslash should be while # is only accessible via Option-3. Meanwhile @ and " have swapped places and what used to be the grave key (top left corner) is used for two symbols I don’t know the names for and have never knowingly used.
Shouldn’t be a problem. Most of the time the MacBook will be docked and I’ll be using an external keyboard. I used a Microsoft Natural Ergonomic Keyboard 4000 with my Windows laptop and got on very well with it. Of course, like anything good, they don’t make them anymore. So I got the replacement for it - the Microsoft Ergonomic Keyboard. The main differences are that the keyboard is less ergonomic, the keys feel cheaper, the integrated mouse wheel has gone but they have (infuriatingly) added dedicated buttons to open Office and an Emoji picker. At this point I should mention that my setup will include both a PC and a Mac with a shared keyboard/mouse/monitor. So, an external Apple keyboard was never an option.
I plugged the keyboard in and it was detected straight away. I was prompted to press the key to the left of Z so that macOS could determine what kind of keyboard I had. Great, I thought. The famous Mac first class user experience. Everything was fine until I tried typing symbols. When I hit backslash I got grave, when I hit # I got backslash and when I tried grave I got the symbol that cannot be named, §.
How keyboards actually work
As far as the Mac is concerned there are only three types of keyboard - ANSI, ISO and JIS.
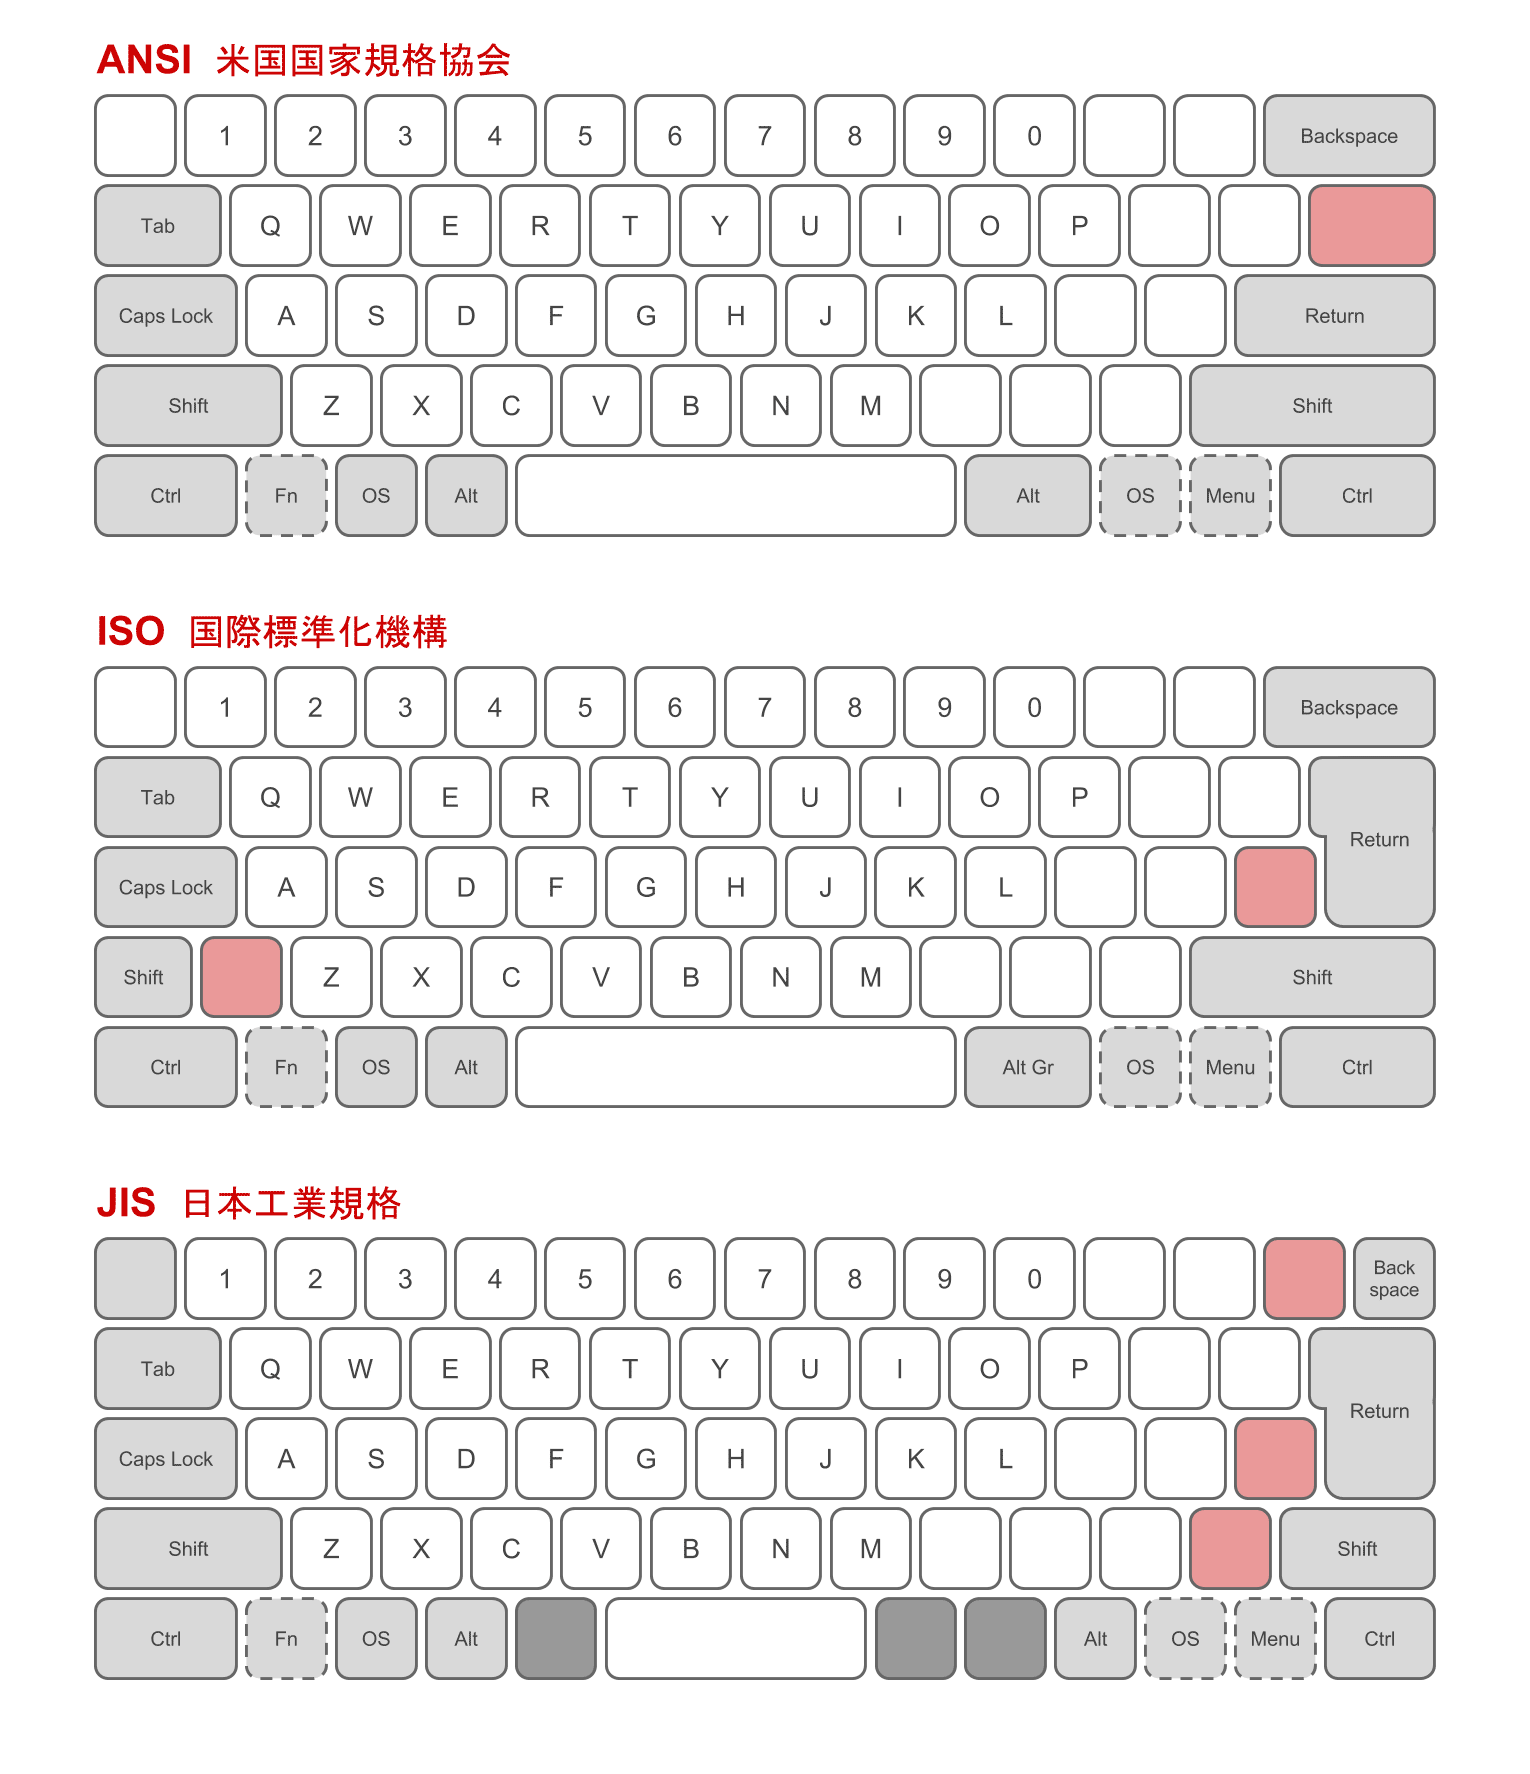
The business of pressing the key to the left of Z was just to check whether physically the keyboard had an ISO layout. Modern keyboards use USB HID Usage Codes to identify which key was pressed. On my ISO layout keyboard the key to the left of Z is code 0x64 described as “Keyboard Non-US \ and |”. Which is what is printed on the key. So why does pressing it generate a grave? Because it doesn’t matter what is printed on the key. All the HID code does is identify a physical key. On my MacBook’s built in keyboard the key to the left of Z has “`” and “~” printed on it. The keyboard still sends code 0x64 when it’s pressed.
The mapping from a HID code to the Unicode character generated is defined by the macOS input source. My MacBook has a British input source defined to match the built in British keyboard. Whenever I press a key on my external keyboard it will generate the same character as the corresponding key on the built in keyboard. You can add other input sources and manually switch between them. However, there is no Windows British input source available. Even if there was it would be painful to have to manually switch whenever I moved between keyboards.
Enter Karabiner-Elements
I needed a way to remap the keys on my external keyboard while leaving the built in keyboard alone. After some intensive research (i.e. googling and clicking on random links) it seemed clear that Karabiner-Elements was what I was looking for. It supports remapping keys, different mappings per modifier, support for PC specific keys and more.
My first experience of Karabiner-Elements didn’t go well. The installation experience involves approving access for three separate system level components (with documentation that didn’t match my version of macOS) and ends with going through the “press the key to the left of Z” keyboard setup routine again. I pressed a few keys on my external keyboard to see if anything had changed. Same behavior as before. I tried the MacBook’s built in keyboard and to my surprise found that § and grave were reversed.
Some more googling and I found that this is a known issue. I then went down the rabbit hole trying out the suggested fixed and workarounds. I ended up putting my system in a state where pressing any key on the external keyboard crashed the macOS window manager and logged me out. I had also noticed that the Karabiner-Elements UI let me define simple remappings (change one physical key to another) on a per keyboard basis but not the complex mappings I would need to use.

I jumped to the (mistaken) conclusion that only simple modifications could be done on a per keyboard basis. Combined with the intrusive installation, broken built in keyboard mapping and the crash on any external keyboard key I decided to uninstall and look for something else.
A detour via hidutil
While researching the problems with Karabiner-Elements I came across a blog post that described the macOS command line hidutil utility that supports key remapping without having to install anything. You can even make the remapping conditional on a specific keyboard product id. You do have to pass in HID usage codes as hex values. The mapping applies to the current session only but you can save it in the form of a Launch Agent (in plist format) so that it will be run for you on login.
Luckily some kind soul has created a generator that lets you specify the keys you want to remap by name and then creates the plist for you. There are two problems. First, you can only define the equivalent of Karabiner-Elements simple modifications. I was able to make grave, backslash, and ~ work correctly but not #, @. or ". Secondly, the mapping doesn’t survive the keyboard being unplugged, which in my case happens whenever I resume from sleep. I was able to hack around that by setting up the mapping to reapply every 60 seconds but it didn’t feel great. You can see my launch agent here.
It is possible to apply the mapping based on a keyboard connected event being received but making it work properly is quite involved. I’d already decided to go back and have another look at Karabiner Elements.
Round 2 with Karabiner-Elements
I did what I should have done in the first place. Put some effort into understanding how Karabiner-Elements works and then make a more informed decision. After all, it’s open source so I should be able to find out whatever I need. There’s high level development documentation that provides a great overview of how everything fits together with an explanation of the choices they made.

In order to support remapping of all physical keys in all contexts (including during secure input like password entry) Karabiner needs to monitor, grab and post keyboard events at the HID device layer. Monitoring is handled by the observer process, grabbing events by the grabber and posting events using a virtual HID device installed by Karabiner. These are the three components that need privileged access. When a keyboard is grabbed all events flow through the grabber process which applies the defined remapping rules and then posts the modified events to the system via the virtual HID device. This explains why I had to go through the macOS keyboard setup experience again. Karabiner looks like a new keyboard to macOS.
I now knew that grabbing a keyboard is optional. As I don’t want to remap any keys on the built in keyboard I can fix the issue with the incorrect mapping of the built in keyboard by ignoring it.
The next thing to understand is that in classic unix style, behavior is entirely driven based on a config file. The Karabiner processes monitor the config file and apply any modifications immediately. All the Karabiner-Elements preferences UI does is read the config file and write any changes you make in the UI back to it. The UI only exposes a subset of the functionality available - in particular any complex rules need to be written by hand. Skip straight to the bottom of the documentation set and dive into the Configuration Reference Manual. Turns out you can make complex modifications conditional in a variety of ways including based on properties of the keyboard.
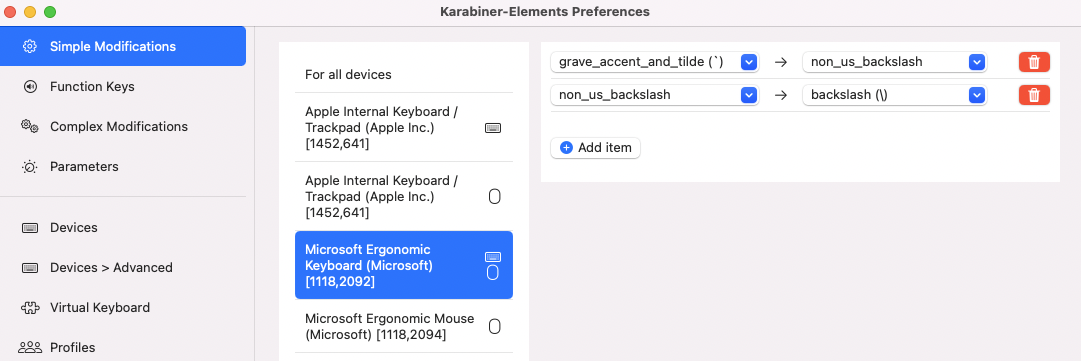
I was confident enough to re-install Karabiner and try again. First I confirmed that I could ignore the built in keyboard and that it did fix the broken mapping. I then used the UI to setup simple modifications equivalent to my hidutil config. Next I tried writing a complex modification that would be restricted to acting only on events coming from a Microsoft Ergonomic keyboard.
The configuration documentation included links to external generators to make it easier to author rules, including a web UI. It does warn you that it is a work in progress and it very clearly is. I used it to create a complex modification which remapped a single key with a device conditional. I then spent too much time trying to figure out why the rule didn’t do anything. It turns out that the generator outputs the device vendor and product id as json strings when Karabiner expects them to be encoded as integers.
The Karabiner-Elements UI doesn’t support authoring your own complex modifications but it does allow you to import rules from an extensive library of contributions. I found the best way to get started was to download rules similar to what I was looking for and then tweak them as required. I found the collection of device specific rules particularly helpful.
Success! I have a Karabiner config that remaps all the symbols I care about. It survives a reboot, it survives unplugging the keyboard, it works everywhere I can enter text.
I also had a look to see if I could make the Office and Emoji keys do something more useful. Funnily enough, Office and Emoji keys are not part of the USB HID standard set of keycodes. So, what happens when you press those keys? Well, Office generates Cmd-Option-Shift-Control and Emoji generates Cmd-Option-Shift-Control-Space. I guess the Windows team assumed that no one would use those key combinations in real life so it was free to map them to whatever it likes. I could define Karabiner rules to match those sequences but decided against it. I’ll stick to remapping physical keys that can’t conflict with anything else.
Apple also has some non-standard keys on its keyboards. For example, the fn/globe key. How does it handle the problem? Apple being Apple, they generate a non-standard keycode they made up. Apparently third party keyboard manufacturers that want to support the special Apple keys need to pay a license fee otherwise macOS will ignore them.
There was a temptation to get a little bit obsessed and also remap the symbols on the keyboard that I never use. It was an interesting thought exercise because it revealed the limitations of doing everything at the physical keyboard level. You can only remap a key to a symbol that exists somewhere in the current macOS input source. Effectively, you are restricted to symbols that you can type on the built in keyboard. The easiest way to see what is available is to open Settings -> Language & Region -> Keyboard Preferences -> Input Sources.

If you press the modifier keys you’ll be shown what symbol each key would generate. There are three different layers of symbols selected by Shift, Option and Shift-Option. The key in the top left corner of my external keyboard has grave, ¬ and ¦ symbols. The ¬ can be generated using option-l. The ¦ symbol is not available.
If you dive down the rabbit hole again you’ll find some interesting workarounds. Karabiner-Elements complex modification rules can be set up to run arbitrary shell commands. So you could try temporarily changing the input source, for example to “Unicode Hex”, generate the character you need and change it back again. Or even more creative, run a shell script that puts the character you need on the clipboard and then generate Cmd-V to paste it. Shell commands run asynchronously so you need to introduce a delay after triggering the shell command and then cross your fingers and hope you made it long enough.
Looking at Espanso
A cleaner, more general solution would be to try Espanso. Espanso is described as a full-blown text expander. You define matches which consist of trigger patterns that match against the characters you type and replacements which replace what you typed. I’ve learned my lesson with Karabiner-Elements so before doing anything I did a deep dive into how Espanso works.
Espanso is another open source project. It doesn’t have an overview development document like Karabiner so I had to do some digging. Espanso operates at the level of macOS window system events. Window system keyboard events are generated after applying the input source mapping to generate unicode characters. A keyboard event can generate zero, one or more Unicode characters. For example, many European language input sources include “dead keys” which don’t generate a character themselves but will modify what is generated when a subsequent key is pressed. The most common use is to add accents to letters.
The keyboard event includes both the physical key pressed and the unicode characters generated. Unless the physical key is something interesting like a modifier, most applications will just consume the unicode characters and ignore the physical key.
Espanso uses the addGlobalMonitorForEvents API to monitor keyboard events sent to applications. Unlike Karabiner it doesn’t have access to secure input and doesn’t have access to the full sequence of physical key presses. That’s not a problem for its intended purpose. Espanso has no way to grab or modify events before the intended application receives them. Instead, when it spots a sequence of characters that match a trigger, it posts its own keyboard events using CGEventPost. First, it sends a sequence of backspace characters intended to erase the trigger sequence. Next, it sends the replacement characters. The trick is to create an event for a boring physical key (it uses space) and pass the replacement characters as the unicode characters the input source generated. It doesn’t matter that the characters it sends aren’t anything that any input source would generate for space. As long as the receiving application handles keyboard events in a “normal” way it works.
Espanso should work well with Karabiner-Elements. It will receive the events that Karabiner generates after they’ve gone through the macOS input source. So, if I really wanted to be able to type a ¦ symbol, I could use a Karabiner-Elements complex rule to generate a trigger string that I’m unlikely to type intentionally. For example, §broken-bar§. Then setup an Espanso match for that string with the ¦ symbol as the replacement character.
Espanso does an awful lot more than simple text replacement including regexp matches, dynamic replacements, cursor positioning within the replacement text, extensions for image and html replacements, packages of contributed matches, and forms templates. Matches can apply globally or dependent on the application that will receive the input. I will certainly give it a try when I feel the need to add more automation to my life.
For now, I think I’ve spent enough time going down this particular rabbit hole.