Last time we got good results when we tried out TypeDoc for API reference documentation generation. I left you with a cliff hanger. How do we integrate TypeDoc into my GitHub Pages based publishing pipeline? And how should we surface API documentation on the blog focused Candid Startup site?
Publishing
The classic way of publishing is to check the generated HTML into GitHub, then use the standard GitHub pages setup to deploy the site. The TypeDoc output even includes a .nojekyll file so GitHub knows to use the html as is, rather than running it through Jekyll.
I want to avoid having to check in the generated documentation. It’s an extra manual step and clutters up the repo.
GitHub Pages uses GitHub Actions to publish. You can write your own publishing workflow using the same building blocks that GitHub Pages uses. Once you’ve generated your content, use the upload-pages-artifact action to create an artifact ZIP of the directory you want to publish. Then follow up with deploy-pages to deploy an artifact ZIP.
I copied my NPM Publish workflow and modified it to come up with this.
name: Docs

on:
  workflow_dispatch:
  workflow_run:
    workflows: [Build CI]
    types: [completed]

jobs:
  build:
    if: |
        github.event_name == 'workflow_dispatch' ||
        ( github.event.workflow_run.conclusion == 'success' &&
          github.event.workflow_run.event == 'push' &&
          github.event.workflow_run.head_branch == 'main' &&
          contains(github.event.workflow_run.head_commit.message, 'chore(release)'))
    runs-on: ubuntu-latest
    permissions:
      contents: read
    steps:
      - uses: actions/checkout@v4
      - uses: actions/setup-node@v4
        with:
          node-version: 20.X
          registry-url: https://registry.npmjs.org/
      - run: npm ci
      - run: npx typedoc
      - uses: actions/upload-pages-artifact@v3
        with:
          path: "temp/"

  publish:
    needs: build
    permissions:
      pages: write      # to deploy to Pages
      id-token: write   # to verify the deployment originates from an appropriate source
    environment:
      name: github-pages
      url: $
    runs-on: ubuntu-latest
    steps:
      - name: Deploy to GitHub Pages
        id: deployment
        uses: actions/deploy-pages@v4
The deploy-pages documentation recommends running it in a separate job, so I did. With the requirement to upload the content as an artifact, there’s nothing stopping you running the two stages as separate jobs. Presumably GitHub thinks doing it this way is more reliable or better for load balancing or something.
I triggered a run manually. The build job completed successfully. Publish resulted in this.
Run actions/deploy-pages@v4
Fetching artifact metadata for "github-pages" in this workflow run
Found 1 artifact(s)
Creating Pages deployment with payload:
{
	"artifact_id": 1694669341,
	"pages_build_version": "2908bdcfcfd9eab618209be2108bc5059da34a9e",
	"oidc_token": "***"
}
Error: Creating Pages deployment failed
Error: HttpError: Not Found
    at /home/runner/work/_actions/actions/deploy-pages/v4/node_modules/@octokit/request/dist-node/index.js:124:1
    at processTicksAndRejections (node:internal/process/task_queues:95:5)
    at createPagesDeployment (/home/runner/work/_actions/actions/deploy-pages/v4/src/internal/api-client.js:125:1)
    at Deployment.create (/home/runner/work/_actions/actions/deploy-pages/v4/src/internal/deployment.js:74:1)
    at main (/home/runner/work/_actions/actions/deploy-pages/v4/src/index.js:30:1)
Error: Error: Failed to create deployment (status: 404) with build version 2908bdcfcfd9eab618209be2108bc5059da34a9e.
Request ID 2BC1:22C3E:4BBB537:8CCB6B2:66910182
Ensure GitHub Pages has been enabled: https://github.com/TheCandidStartup/infinisheet/settings/pages
I’m so glad there was a meaningful error message at the end of all that.
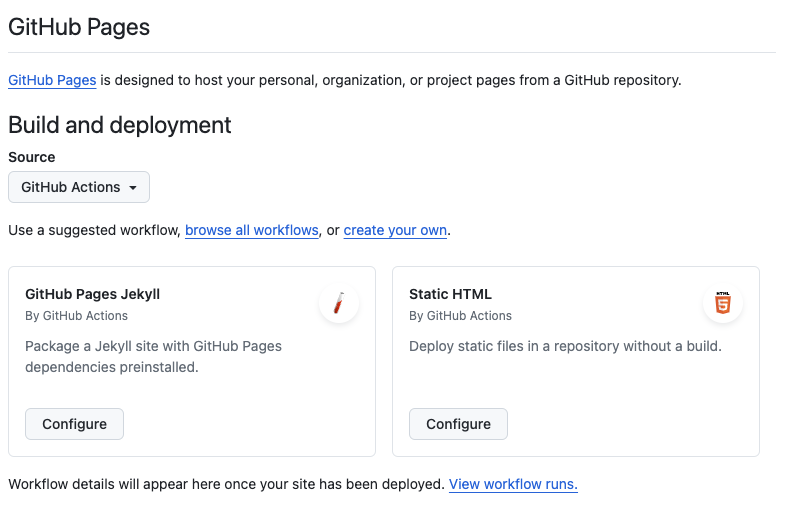
Doh. Remember to enable GitHub Pages before trying to deploy to it. Pick “GitHub Actions” as the source.


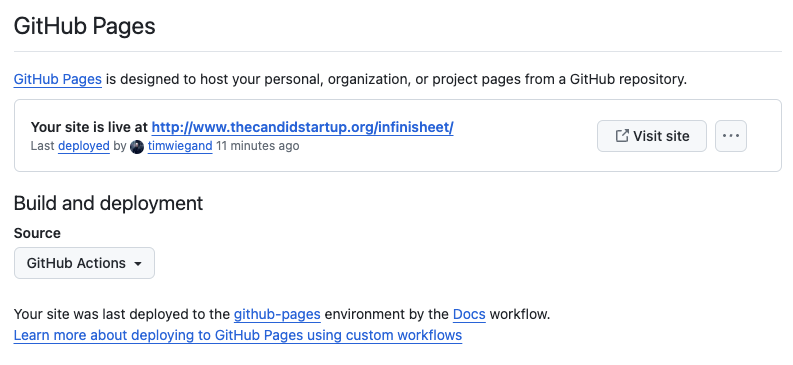
When you first enable “GitHub Actions” as the source you will be encouraged to configure a workflow from a template. Ignore this if, like me, you’ve already created your own workflow. There’s no extra step needed to connect GitHub pages to a specific workflow. Once enabled, any workflow can publish. Once a workflow has published, the UI changes to show the details seen here.


When you have a pages site at the organization level with a custom domain, any project sites automatically use the same custom domain. Which is how I ended up with the documentation published to https://thecandidstartup.org/infinisheet. This all seems to be hardcoded so I’ll need to be careful to make sure my repo names don’t conflict with content on the blog.
Adjusting TypeDoc Generated Content
I replaced the default use of the repo README.md with a dedicated typedoc-assets/root.md file. That lets me fix broken links caused by GitHub specific links in the README. It also means I can tailor the content for a reference documentation home page.
Next, I added custom.css to adjust the documentation’s styling to fit in with the Candid Startup theme. The initial idea was to restyle the whole thing to match exactly. However, it’s really difficult to execute given the differences in document structure. To make it even harder, TypeDoc supports a dynamic choice of dark or light theme which is impossible to accommodate without a complete rebuild of the blog theme.
In the end I made minimal changes. The only global change is to use the same font as the rest of the site. Beyond that, I focused on styling of the top menu bar. The idea is to do just enough so that the documentation feels part of the same navigation structure, while reinforcing that this is a separate area with different rules.
Even though I know that Posts, Topics, etc. links are the same as on the blog, it didn’t feel that way. I made the documentation menu bar the same size and used the same text and background color. I could only match the background color for the light theme. Fortunately, text in Candid Startup green works with the dark theme too.


I haven’t tried to exactly match the positioning of text. The structures are too different. The blog uses a single column with wide margins while the documentation has a three column layout. It was frustrating enough just trying to get vertical alignment similar.
Any future changes in blog style will need to be reproduced in the custom stylesheet. Another reason to keep changes minimal. I’ve made sure to keep track of where values came from.
body {
  /* From jekyll-theme-cayman-blog.scss */
  font-family: "Open Sans", "Helvetica Neue", Helvetica, Arial, sans-serif;
  font-size: 16px;
}

:root {
  /* From blog.scss - $background-color */
  --light-color-background-secondary: #fdfdfd;
}

.tsd-page-toolbar a {
    /* From blog.scss - $section-headings-color */
  color: #159957;
}

.tsd-page-toolbar {
  /* From blog/_layout.scss - .site-header{  min-height: $spacing-unit * 1.865; }
   *      blog.scss - $spacing-unit: 30px
   */
  height: 55.95px;
}

.tsd-page-toolbar .tsd-toolbar-contents {
  /* Only way I could find to center links in enlarged title bar. The toolbar
   * content is given a height of 2.5rem in the TypeDoc stylesheet.
   */
  padding-top: calc((55.95px - 2.5rem)/2);
}

.container-main {
  /* Copied from TypeDoc style.css and adjusted to account for larger header
   * min-height = viewportHeight - HeaderHeight - FooterHeight - Margin
   * Changed HeaderHeight from 41px to 57px (base height + 1 for the border)
   */
  min-height: calc(100vh - 57px - 56px - 4rem);
}
TypeDoc Extras Plugin
I installed the TypeDoc extras plugin which gives me some more customization options.
npm install --save-dev typedoc-plugin-extras

added 1 package, and audited 1029 packages in 2s
I used it to change the title string displayed on the left side of the menu bar to match the rest of the site, and to add the Candid Startup favicon.
{
  "plugin": [ "typedoc-plugin-extras" ],
  "customTitle": "The Candid Startup",
  "favicon": "./typedoc-assets/favicon.ico",
  "titleLink": "https://thecandidstartup.org",
  "footerTypedocVersion": true
}
The rest of the plugin is focused on adding more information to the footer. I added the TypeDoc version (why not?). The other options add additional lines to the footer, increasing the size, which then breaks the layout. It makes the main content too big, which results in a scroll bar being added to the page. The same thing happens with the existing TypeDoc option that adds arbitrary text to the footer.
The extra information isn’t useful enough to lose page space to the footer. It’s certainly not worth fiddling with the custom stylesheet again.
TypeDoc Coverage Plugin
I couldn’t resist adding one more plugin.
% npm install -D typedoc-plugin-coverage

added 1 package, and audited 1030 packages in 1s
The coverage plugin generates a badge that reports the percentage of your API’s surface area that’s documented. It’s functional but has a couple of rough edges.
It’s annoying that referencing the badge in my documentation home page triggers a TypeDoc warning when building. The badge is copied into the output directory by the plugin after links are validated.
./typedoc-assets/root.md:1:27 - [warning] The relative path ./coverage.svg is not a file and will not be copied to the output directory
1 [](https://www.npmjs.com/package/typedoc-plugin-coverage)
[info] Documentation generated at ./temp
[warning] Found 0 errors and 1 warnings
The badge doesn’t resize so I can’t use “Docs Coverage” or similar as a label. Short strings like “Docs” look weird too. In the end I stuck with the default “Document” as it neatly fits the badge.
You’ve got to love the ability of a badge to drive behavior. The initial badge showed coverage at 52%. So naturally I immediately had to get to 100%.
Top tip. You can use typedoc --logLevel Verbose | grep "not considered" to list all API items that are considered undocumented. Knock out some documentation, rinse and repeat.
Adding Documentation to the Blog Org Structure
My first thought was to add “Projects” as a new top level concept. Then create an “Infinisheet” project page which I can use as a landing page to link to GitHub, Documentation, etc. It would be nice to include a list of a few key blogs related to the project. Which means I need a way of tagging blogs by project.
At this point I realized that I was reinventing “Topics” for the subset of topics that relate to a project. Instead, I decided to start by adding an “InfiniSheet” topic and creating whatever content I needed to turn it into a landing page.
I tried a few ways of doing it but nothing seemed quite right. Including links in the topic description is too wordy. It’s hard to pick the links out and hard to understand the navigation structure.
Then I tried adding a special section with a table of links. That looked too contrived.
Finally, it dawned on me. I have a dedicated area for navigation controls in the page header that topics don’t use.
Topic Navigation
Fortunately, I’ve structured the blog to make it easy to add custom navigation controls. Each type of page has a layout. You can add custom front matter that specifies additional content to include in the page header. This is used by the “post” layout to include previous and next post buttons, together with buttons for each topic the post was tagged with.
I updated the “topic” layout to pull in its own custom navigation controls.
---
layout: default
include_header: topic-nav.html
---
The navigation controls use custom front matter in each topic to add buttons for parent and related topics, together with buttons for common external links like GitHub, NPM and Documentation.
<div class="candid-header-nav">
{% if page.up %}
{% assign topic-page = site.topics | where: "topic", page.up | first %}
<a class="candid-header-link" href="{{ topic-page.url | absolute_url }}">⇑ {{ topic-page.title | escape }}</a>
{% endif %}
{% if page.github %}
<a class="candid-header-link candid-header-external" href="{{ page.github }}">GitHub</a>
{% endif %}
{% if page.npm %}
<a class="candid-header-link candid-header-external" href="{{ page.npm }}">NPM</a>
{% endif %}
{% if page.docs %}
<a class="candid-header-link candid-header-external" href="{{ page.docs | absolute_url }}">Documentation</a>
{% endif %}
{% assign tags = page.also | split: " " %}
{% for tag in tags %}
{% assign topic-page = site.topics | where: "topic", tag | first %}
{% if topic-page %}
<a class="candid-header-link" href="{{ topic-page.url | absolute_url }}" title="{{ topic-page.title }}">{{ topic-page.title | escape }}</a>
{% endif %}
{% endfor %}
</div>
Here’s the front matter for the InfiniSheet topic.
---
layout: topic
title: InfiniSheet
topic: infinisheet
tagline: All about the "infinisheet" monorepo
up: spreadsheets
github: https://github.com/TheCandidStartup/infinisheet
docs: /infinisheet
also: react-virtual-scroll
---
And here’s what the resulting page header looks like.


Projects Page
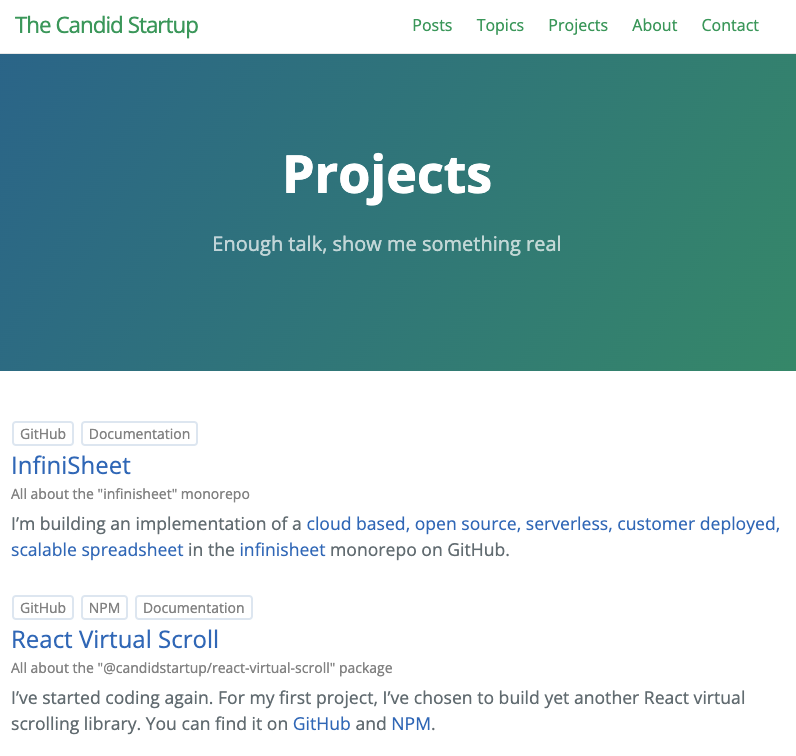
I still want to have a dedicated “Projects” page to make it easy to find the topics that correspond to actual projects. That turned out to be easy to do. I copied the “Topics” page and filtered the list of topics to include just those with links to GitHub, NPM or Documentation. I also added clickable badges for each of those links in the same way I do for blog posts.
I made a little more room in the menu by retiring the Now page. Now was a standard page included with the Cayman blog theme. I never made much use of it. I post a blog every week, so you’re not left wondering what I’m up to.


Conclusion
That all went pretty smoothly. It was fun to hack on the blog again. Every time I do it, I’m surprised by how easy it is to work with.
I’m happy with the way it’s turned out. I particularly like the way the Projects page has its own character, even though it’s automatically generated from topic metadata.
