I’m ready to dive into front-end development. First, I need to make some choices. What tooling and frameworks should I use?
I’ve already decided to use TypeScript with NodeJS on the back end. I want to share code between front end and back end, so will need a front-end development environment that will handle transpilation of TypeScript. I also need tooling that will build code into front-end packages that can be statically served by CloudFront/S3 and back-end packages that can be deployed to Lambda with the NodeJS runtime.
Most teams I previously worked with used React as their front-end framework, so that’s something I want to try. I’ve seen some bloated front ends built with React, so I want to experiment with alternatives too. One team I worked with had good experiences using Preact as a lighter weight alternative to React, so that’s on the list. Diving down the internet rabbit hole also threw up Vue.js and Svelte as contenders. Finally, I like to understand how things work behind the scenes, so I may end up building something using a vanilla JavaScript environment.
My first choice is to use Vite for my front-end tooling.
Why Vite?
As I was looking around at different frameworks, I saw lots of recommendations for Vite in their documentation. Looking at the Vite Documentation, they have direct support for all the frameworks I was interested in, plus several more. There are templates for each, in JavaScript and TypeScript flavors.
Vite is focused on my two main requirements. It has a really interesting model for the development experience. It automatically divides your application into dependencies and source code. Dependencies are components, typically third party, that change infrequently. Vite pre-bundles the dependencies using esbuild. Source code is the stuff that you write, that will be edited often, that may contain non-plain JavaScript that needs transpilation.
There is no build step for source code. Instead, transpilation happens on the fly as the browser makes requests to the Vite development server. The development server supports Hot Module Replacement (HMR) for source code modules, with fast refresh integrations for common frameworks. Edit a source file, save it and the browser reloads just the impacted modules, preserving current state.
Vite also has tools for creation of a production build using Rollup. Rollup does all the bundling, tree-shaking, code-splitting and other optimizations that you would expect. It’s perfect for deploying a static site.
Finally, I like Vite’s minimalist, forward looking philosophy. It relies heavily on modern browser features. It expects source code to use standard ES modules rather than older legacy module systems (dependencies can use what they like).
Installing Vite
Vite requires NodeJS. Once NodeJS is installed, most Vite workflows are executed via npm or your preferred NodeJS package manager. The last time I installed new tools on my Mac was when I set things up to support local development of the blog. At that time I installed asdf as an install manager, as it supported both Ruby and NodeJS. Time to see if that foresight will pay off.
asdf uses a plugin model for each tool that it supports, so first I’ll need to install the NodeJS plugin. Handily the asdf Getting Started guide has NodeJs as its example for installing a plugin.
% asdf plugin add nodejs https://github.com/asdf-vm/asdf-nodejs.git
Now I can install the latest version of NodeJS.
% asdf install nodejs latest

Installed node-v20.8.0-darwin-arm64 to /Users/tim/.asdf/installs/nodejs/20.8.0
Wow, is NodeJS at version 20 already? How close is that to the bleeding edge? The Github readme for asdf-nodejs has some more details about the plugin. There’s a handy command that can query the most recent LTS (long-term support) version of NodeJS.
% asdf nodejs resolve lts --latest-available

18.18.1
That’s OK, asdf is a tool version manager. I can install 18.18.1 as well and switch between them on a per project basis if needed.
% asdf install nodejs 18.18.1

Installed node-v18.18.1-darwin-arm64 to /Users/tim/.asdf/installs/nodejs/18.18.1
Now I just need to tell asdf which version to default to.
% asdf global nodejs 18.18.1
Next a quick check to see if npm is there.
% npm -v

9.8.1
Scaffolding my First Project
Back to the Vite getting started guide. Vite will scaffold a project for me, using a standard template. I’m going to start with React, and of course I’m using Typescript, so I’ll need the react-ts template. All I need to do is run an npm command and follow the prompts.
 % npm create vite@latest

Need to install the following packages:
create-vite@4.4.1
Ok to proceed? (y) y
✔ Project name: … react-virtual-scroll-grid
✔ Select a framework: › React
✔ Select a variant: › TypeScript + SWC

Scaffolding project in /Users/tim/GitHub/react-virtual-scroll-grid...

Done. Now run:

  cd react-virtual-scroll-grid
  npm install
  npm run dev
The project is created as a sub-folder of the current directory, so I guessed right by running the command in my GitHub directory rather than creating a project directory myself. One surprise was the choice of JavaScript, TypeScript or TypeScript+SWC. What the heck is SWC? It’s not mentioned in the documentation, but some Googling reveals that it’s a drop in replacement for the default TypeScript transpiler which is “up to 20 times faster”. It’s used during development rather than the final build, and was introduced in Vite 4.
Faster is better, right? Looks easy enough to change later if needed, so I decided to go with it. OK, let’s carry on doing what we’re told.
% cd react-virtual-scroll-grid
% npm install

added 153 packages, and audited 154 packages in 32s

37 packages are looking for funding
  run `npm fund` for details

found 0 vulnerabilities
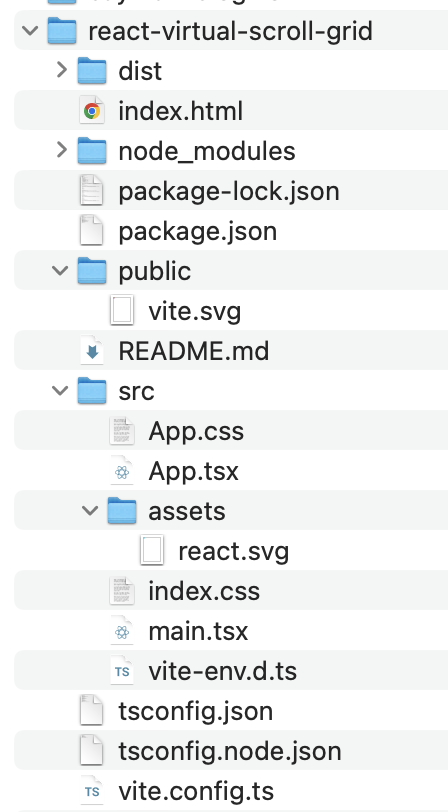
Let’s see what we’ve got.


A pretty minimal looking project but with 250MB of node_modules. Maybe I’m out of touch, but that seems a little excessive for “hello world”. On to the last step.
% npm run dev

  VITE v4.4.11  ready in 213 ms

  ➜  Local:   http://localhost:5173/
  ➜  Network: use --host to expose
  ➜  press h to show help
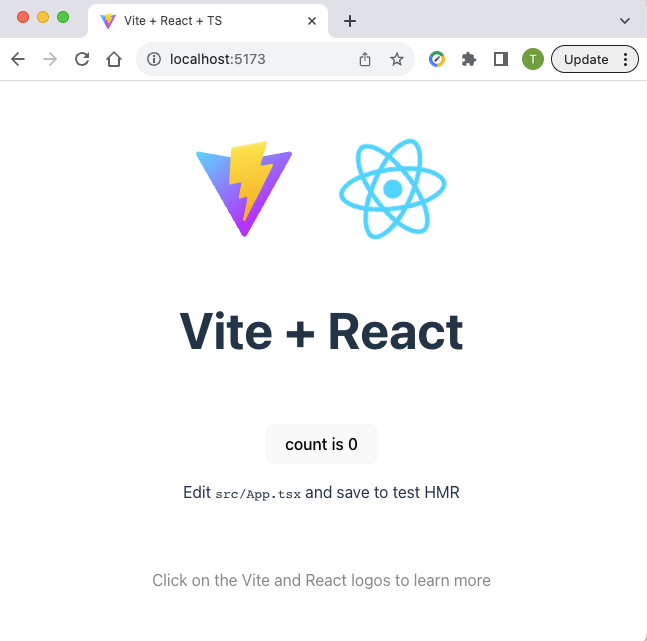
That was easy. Let’s load that URL into the browser and see what happens. It’s alive!


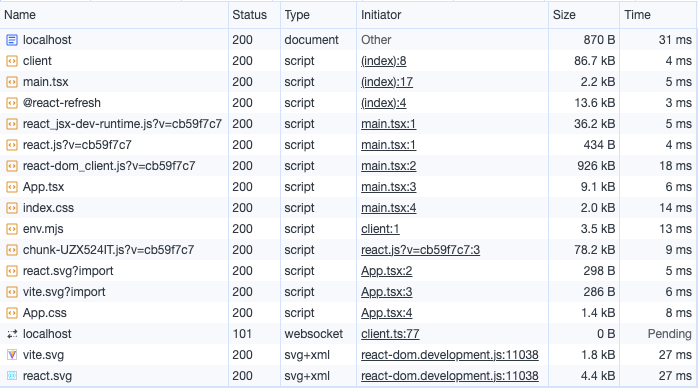
It’s interesting to see how on demand transpilation works in practice. Here’s what the network tab in Chrome developer tools shows me when loading the app.


You can see the source code from the project seemingly being loaded into the browser, interspersed with loading prebuilt chunks of dependencies (names ending with ?v=cb59f7c7). There’s also a websocket connection for the HMR. If you look at the actual response for main.tsx, you can see that it has a response-type of application/javascript, and that the server has returned the results from the transpiler.
Development Experience
I added the generated project to git. The scaffold already contains a .gitignore, so nothing else to do.
git init
git add -all
git commit
I then used GitHub desktop to publish the project to TheCandidStartup/react-virtual-scroll-grid.
Now time to make some changes and see how well the HMR works. As instructed, I made some simple changes to src/App.tsx using Visual Studio Code, then saved the file. The running web app updated instantly. I couldn’t perceive any lag at all. Chrome developer tools confirmed that only App.tsx was reloaded, which took 10ms. Same experience when editing src/App.css.
I’m used to the editing experience with my Jekyll blog, where updates are sub-second but with a noticeable lag. Vite is impressively fast. Admittedly, for a trivial example.
Building for Production
What’s the experience like when building for production? The default configuration produces output suitable for static deployment, so let’s just run the build and see what happens.
% npm run build

> react-virtual-scroll-grid@0.0.0 build
> tsc && vite build

vite v4.4.11 building for production...
✓ 34 modules transformed.
dist/index.html                   0.46 kB │ gzip:  0.30 kB
dist/assets/react-35ef61ed.svg    4.13 kB │ gzip:  2.14 kB
dist/assets/index-d526a0c5.css    1.42 kB │ gzip:  0.74 kB
dist/assets/index-dd535d49.js   143.44 kB │ gzip: 46.12 kB
✓ built in 409ms
Thankfully, the built package is much smaller than all the dependencies in node_modules. 50KB and four files seems very reasonable.
As you might expect, “cache busting” is implemented. The payload chunk names include a checksum. Whenever we change the app and rebuild, the name will change if the contents has changed. This in turn ensures that browsers will download the new chunk rather than using an older cached copy. The fixed entry point of index.html needs to be deployed with a cache policy that prevents caching or has a very short TTL.
We can test the build before we deploy it using the preview server.
% npm run preview

> react-virtual-scroll-grid@0.0.0 preview
> vite preview

  ➜  Local:   http://localhost:4173/
  ➜  Network: use --host to expose
  ➜  press h to show help
Deploying to the Blog
To include as a live example on the blog, I need to tell Vite the base path where the package will be deployed. All paths in the built package are absolute. I could specify the base path in a configuration file but deploying to the blog is a one off. Some head scratching before I figured out the magic runes to pass arguments from npm through to vite.
% npm run build -- --base=/assets/dist/vite-bootstrap/

> react-virtual-scroll-grid@0.0.0 build
> tsc && vite build --base=/assets/dist/vite-bootstrap/

vite v4.4.11 building for production...
✓ 34 modules transformed.
dist/index.html                   0.54 kB │ gzip:  0.31 kB
dist/assets/react-35ef61ed.svg    4.13 kB │ gzip:  2.14 kB
dist/assets/index-d526a0c5.css    1.42 kB │ gzip:  0.74 kB
dist/assets/index-84538aac.js   143.49 kB │ gzip: 46.14 kB
✓ built in 407ms
Notice that the index.js chunk has a different checksum but the other two (as you would expect) are unchanged.
I need to use the same argument if I want to preview the build with it’s custom base path.
% npm run preview -- --base=/assets/dist/vite-bootstrap/

> react-virtual-scroll-grid@0.0.0 preview
> vite preview --base=/assets/dist/vite-bootstrap/

  ➜  Local:   http://localhost:4173/assets/dist/vite-bootstrap/
  ➜  Network: use --host to expose
  ➜  press h to show help
It’s a nice touch that the base path is reflected back in the local URL to use when previewing. Everything looks good. The final step is to copy the content of the dist folder into the blog repo and commit the changes. I’ve embedded the app in an iframe below, or you can open it directly.