I’m ready to add browser based automated testing to my InfiniSheet project. Before we get into the details of getting my chosen tool up and running, let’s have a quick reminder of why we need it.
Testing Pyramid
The concept of the test pyramid has been around for over a decade now. It’s a useful visual metaphor that tells you how to divide tests into buckets with different granularity, while also giving you an idea of how many tests you should have in each bucket.


The base of the pyramid is made up of unit tests. These are the most granular, testing the smallest units of code in isolation. The small code size and isolation makes unit tests fast and easy to understand. You should cover as much testing as possible with unit tests. Front end unit testing typically uses a mock DOM implementation, such as jsdom, to increase isolation.
The next level up in my pyramid is component tests. A component is a meaningful unit of code with a strong abstraction layer and API. In the front end world, a React component would be a great example. You’ll use many of the same techniques as unit testing but with more of a focus on the public API. Component testing typically covers more code, particularly when testing higher level components that are built from simpler components.
Integration tests look at the integration of components with external systems that are mocked at the lower levels of the pyramid. A database is the classic example of an external system. For front end components, integration testing will focus on integration with the browser, perhaps running the same tests with each of the major browsers.
Finally, the top level of the pyramid is end to end testing. You might be testing a full stack application, automating a web app which interacts with a backend service that in turn stores data in a database. Tests at this level involve the most integration, have the most dependencies and are the slowest to setup and run.
Playwright
I’ve had my eye on Playwright for a while. It provides end to end browser based testing in the same space as Selenium, Cypress and WebDriverIO. You write automated tests that interact with a browser that in turn connects to your web app (either local dev server or real staging/production deployment).
The main difference is that rather than using the installed web browser, Playwright installs its own browser binaries built against the upstream open source toolkits used by the main browsers. These include Chromium (Chrome and Edge), Webkit (Safari) and Firefox. This approach gives Playwright more control over its environment, applying patches where needed to support tighter integration.
Playwright tests run entirely out of process, driving each browser through an optimized web socket connection. It can run the same tests against multiple different browsers in parallel. Playwright works with the multiple processes used by modern browsers. For example, you can write tests that interact with multiple browser tabs and multiple origins.
There’s great support for TypeScript out of the box. Like Vite, you can write your tests in TypeScript and Playwright deals with transpilation transparently on demand. Your tests can generate native events indistinguishable from a real user, there’s an integrated test runner and UI, and much more.
Installation
The Installation documentation is minimal, suggesting you simply run npm init playwright@latest. This installs everything, populates a project with package.json and a config file, then creates some example tests.
I’m using a monorepo, so I suspect the standard setup won’t be right for me. Plus I like to understand what’s going on behind the scenes. The only mention of manual installation is in the Updating Playwright section at the bottom of the page.
npm install -D @playwright/test@latest
# Also download new browser binaries and their dependencies:
npx playwright install --with-deps
The first line is as you’d expect but what’s npx playwright install doing? Playwright uses its own system for downloading and installing browser binaries. By default Chromium, Webkit and Firefox will all be installed.
Browser binaries are stored in OS-specific cache folders. Each version of Playwright requires a specific version of browser binaries. Unused binaries for old versions of Playwright are automatically removed when updating.
I was initially worried about doing an end run around npm like this. However, having a fixed set of binaries for each version of Playwright means that versions are still controlled by your package manager. The only downside is the extra step needed to update the browser binaries whenever Playwright gets updated.
The --with-deps argument is a convenience for Continuous Integration. It ensures that all system level dependencies required by the browsers are installed on whatever host system your CI is running on. Developer machines should already have these. If not, you probably want to decide for yourself what system level changes get made.
% npm install -D @playwright/test

added 3 packages, and audited 1046 packages in 7s
The base package is quick to install. All the meat is in the browsers. It took about three minutes to download the binaries.
 % npx playwright install
Downloading Chromium 131.0.6778.33 (playwright build v1148) from https://playwright.azureedge.net/builds/chromium/1148/chromium-mac-arm64.zip
121.6 MiB [====================] 100% 0.0s
Chromium 131.0.6778.33 (playwright build v1148) downloaded to /Users/tim/Library/Caches/ms-playwright/chromium-1148
Downloading Chromium Headless Shell 131.0.6778.33 (playwright build v1148) from https://playwright.azureedge.net/builds/chromium/1148/chromium-headless-shell-mac-arm64.zip
77.5 MiB [====================] 100% 0.0s
Chromium Headless Shell 131.0.6778.33 (playwright build v1148) downloaded to /Users/tim/Library/Caches/ms-playwright/chromium_headless_shell-1148
Downloading Firefox 132.0 (playwright build v1466) from https://playwright.azureedge.net/builds/firefox/1466/firefox-mac-arm64.zip
81.6 MiB [====================] 100% 0.0s
Firefox 132.0 (playwright build v1466) downloaded to /Users/tim/Library/Caches/ms-playwright/firefox-1466
Downloading Webkit 18.2 (playwright build v2104) from https://playwright.azureedge.net/builds/webkit/2104/webkit-mac-14-arm64.zip
69.5 MiB [====================] 100% 0.0s
Webkit 18.2 (playwright build v2104) downloaded to /Users/tim/Library/Caches/ms-playwright/webkit-2104
Downloading FFMPEG playwright build v1010 from https://playwright.azureedge.net/builds/ffmpeg/1010/ffmpeg-mac-arm64.zip
1.1 MiB [====================] 100% 0.0s
FFMPEG playwright build v1010 downloaded to /Users/tim/Library/Caches/ms-playwright/ffmpeg-1010
Example Test
I added playwright.config.ts and tests/example.spec.ts to my spreadsheet-sample app, copied from a Playwright Example. I executed the test using the Playwright CLI and it worked first time.
% npx playwright test

Running 18 tests using 4 workers
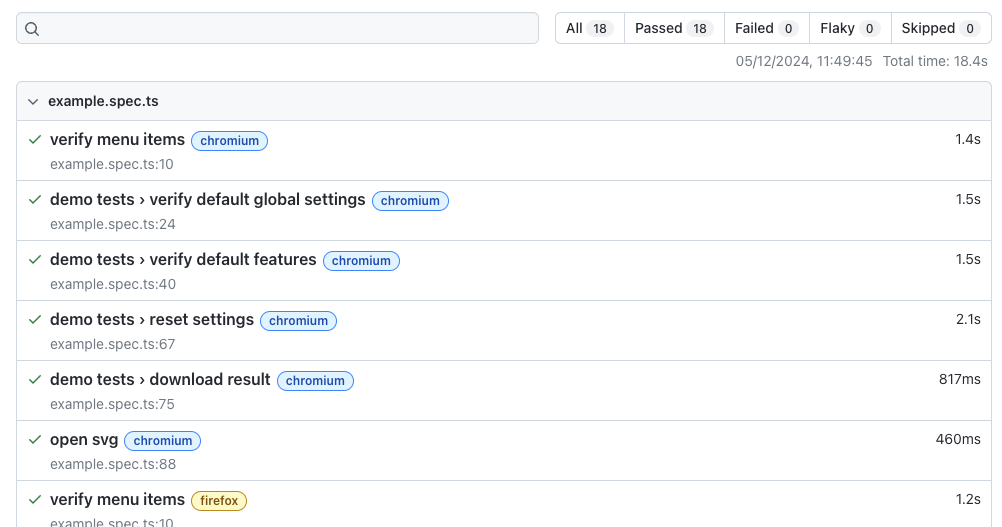
  18 passed (18.4s)

To open last HTML report run:

  npx playwright show-report
Running npx playwright show-report opened up an html report in my browser. Output goes into playwright-report and test-results subdirectories. I added both to my .gitignore.


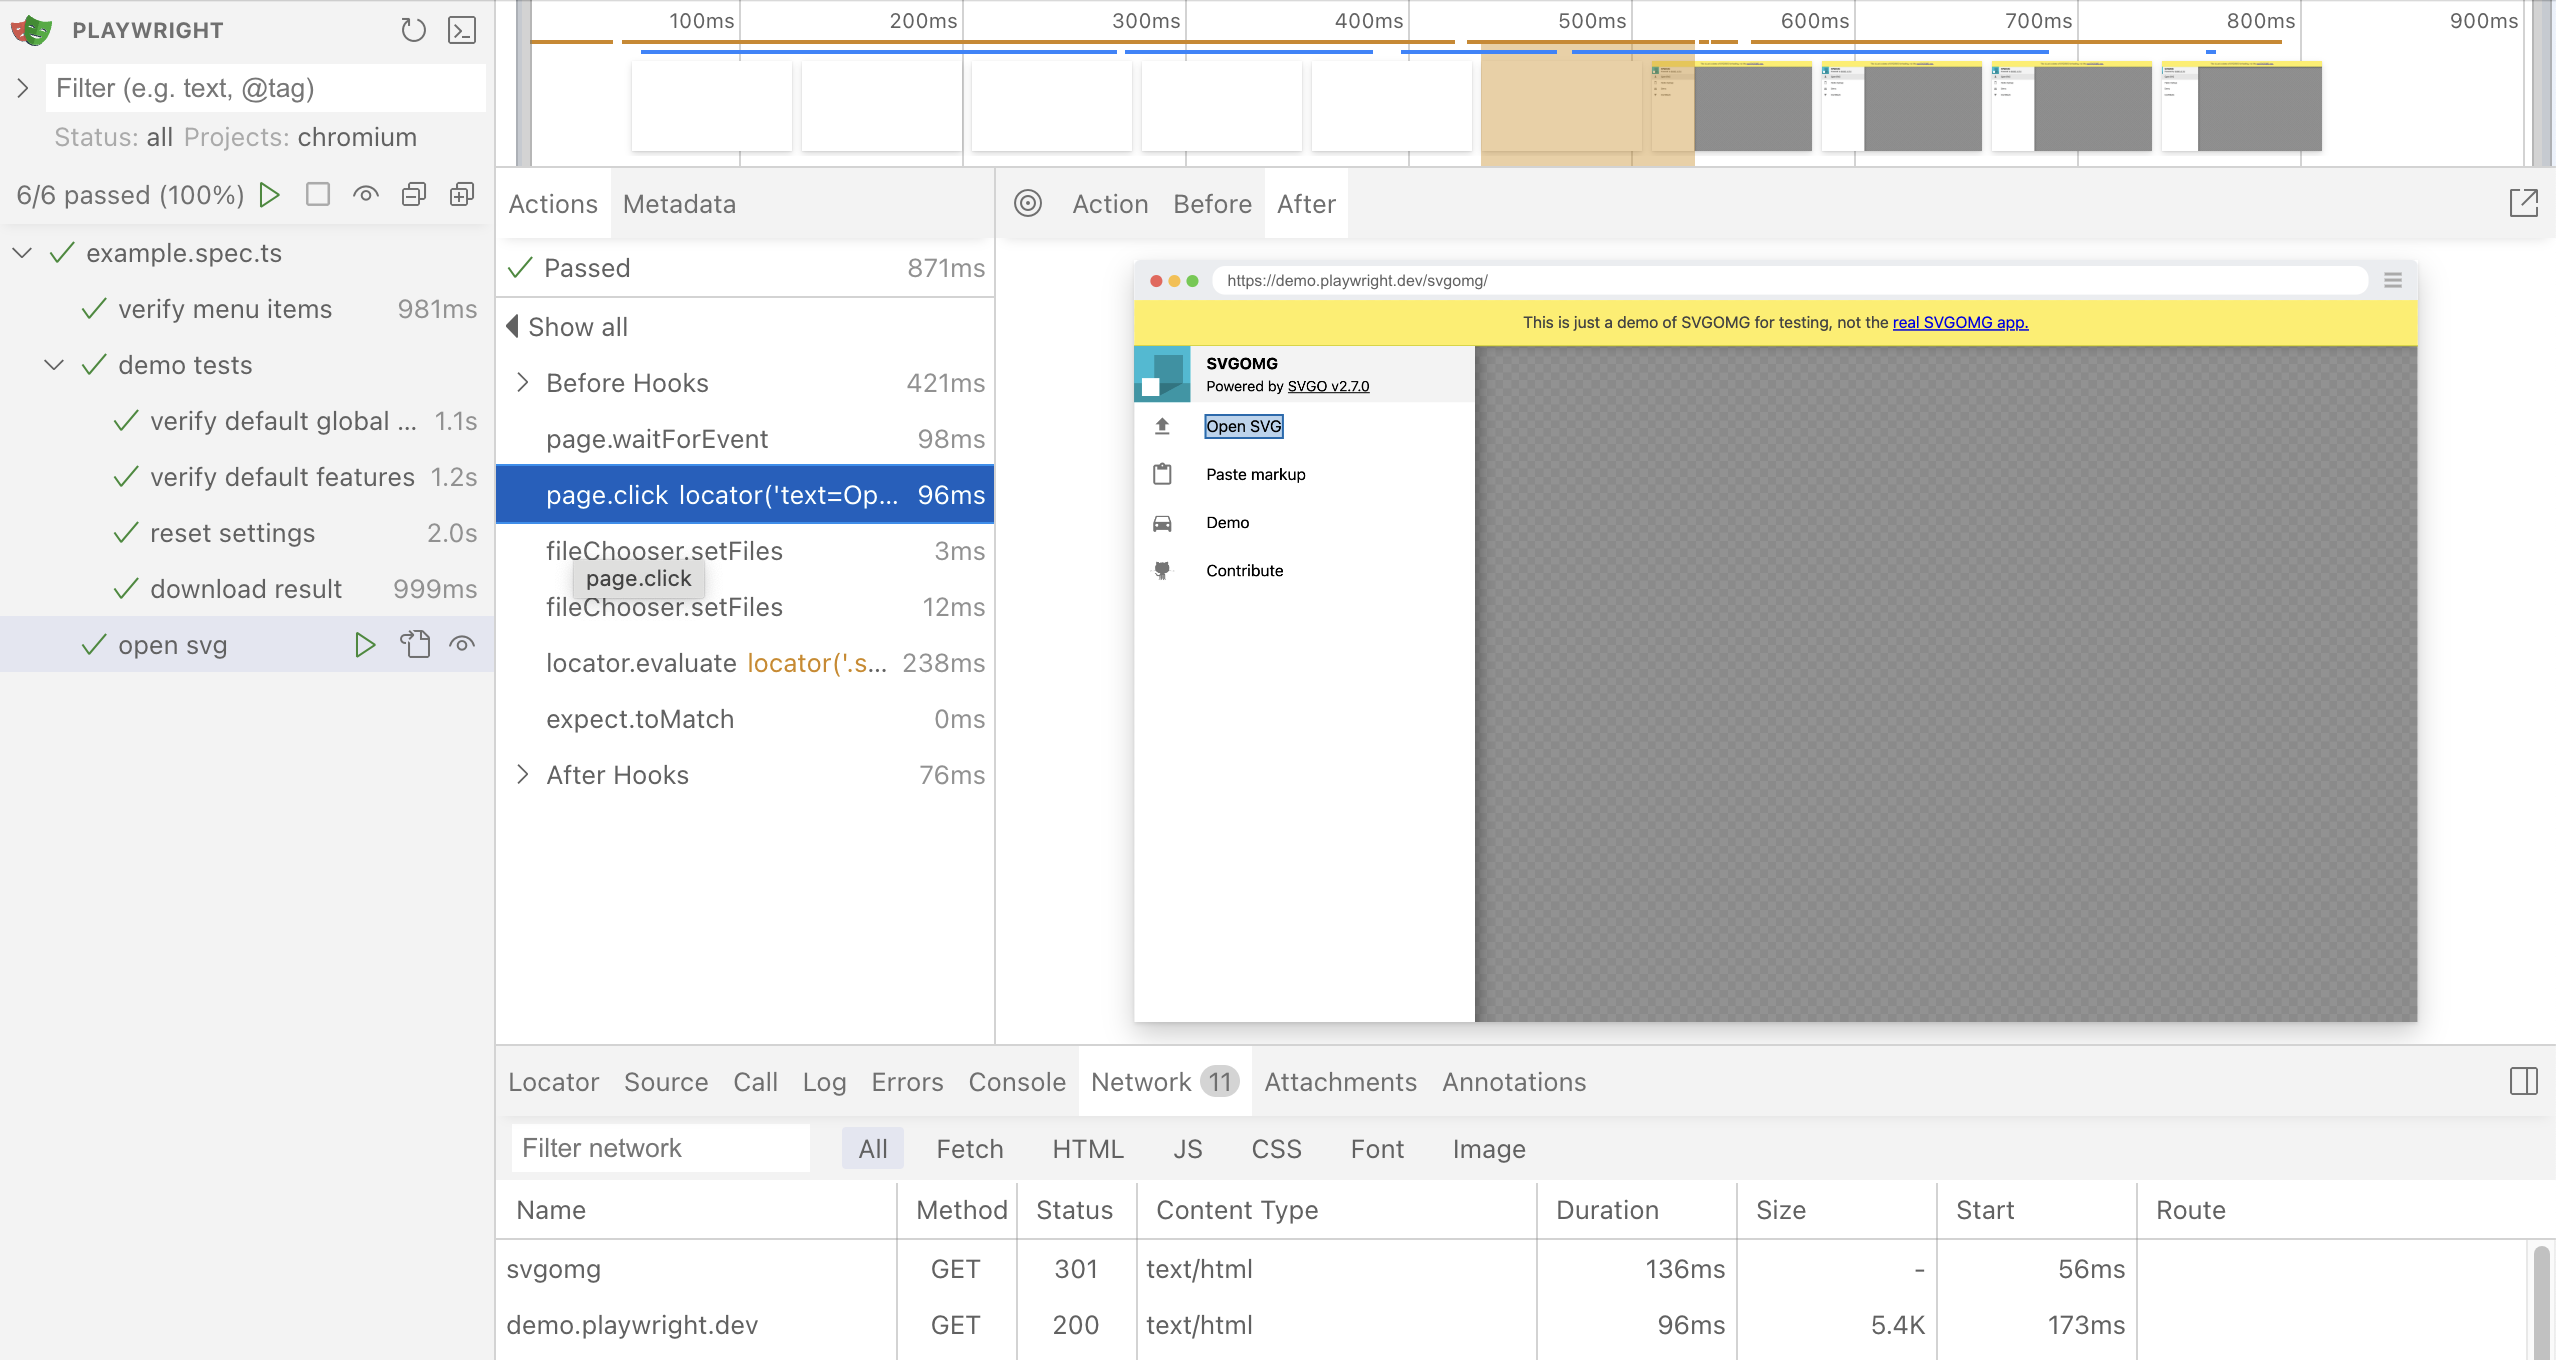
The example test uses a web app running at https://demo.playwright.dev/svgomg. It interacts with the web page, uploads and downloads a file, using all 3 browsers, in parallel, in 18 seconds.
You can also run Playwright with a UI to develop and debug your tests. There’s a timeline, screenshots after each action, the corresponding test source code, logs, errors, network activity and more.


There’s also a VS Code extension which includes most of the functionality of the Playwright UI integrated into the VS Code test tab. Test failures are reported in the source code editor window, complete with callstack. You can also live debug a test.
Writing Tests
Playwright tests perform actions and assert that the resulting state matches expectations. Playwright automatically waits for actions to complete before checking assertions.
Tests start by navigating to a specific URL.
await page.goto('http://localhost:5173/');
You’ll then need to interact with elements on the page. You first need to locate the element, then perform an action on it.
await page.getByRole('link', { name: 'Get started' }).click();
Locators
There are lots of types of locator. The documentation lists them in order of preference, with getByRole the most preferred. This locates an element by its ARIA role and accessible name.
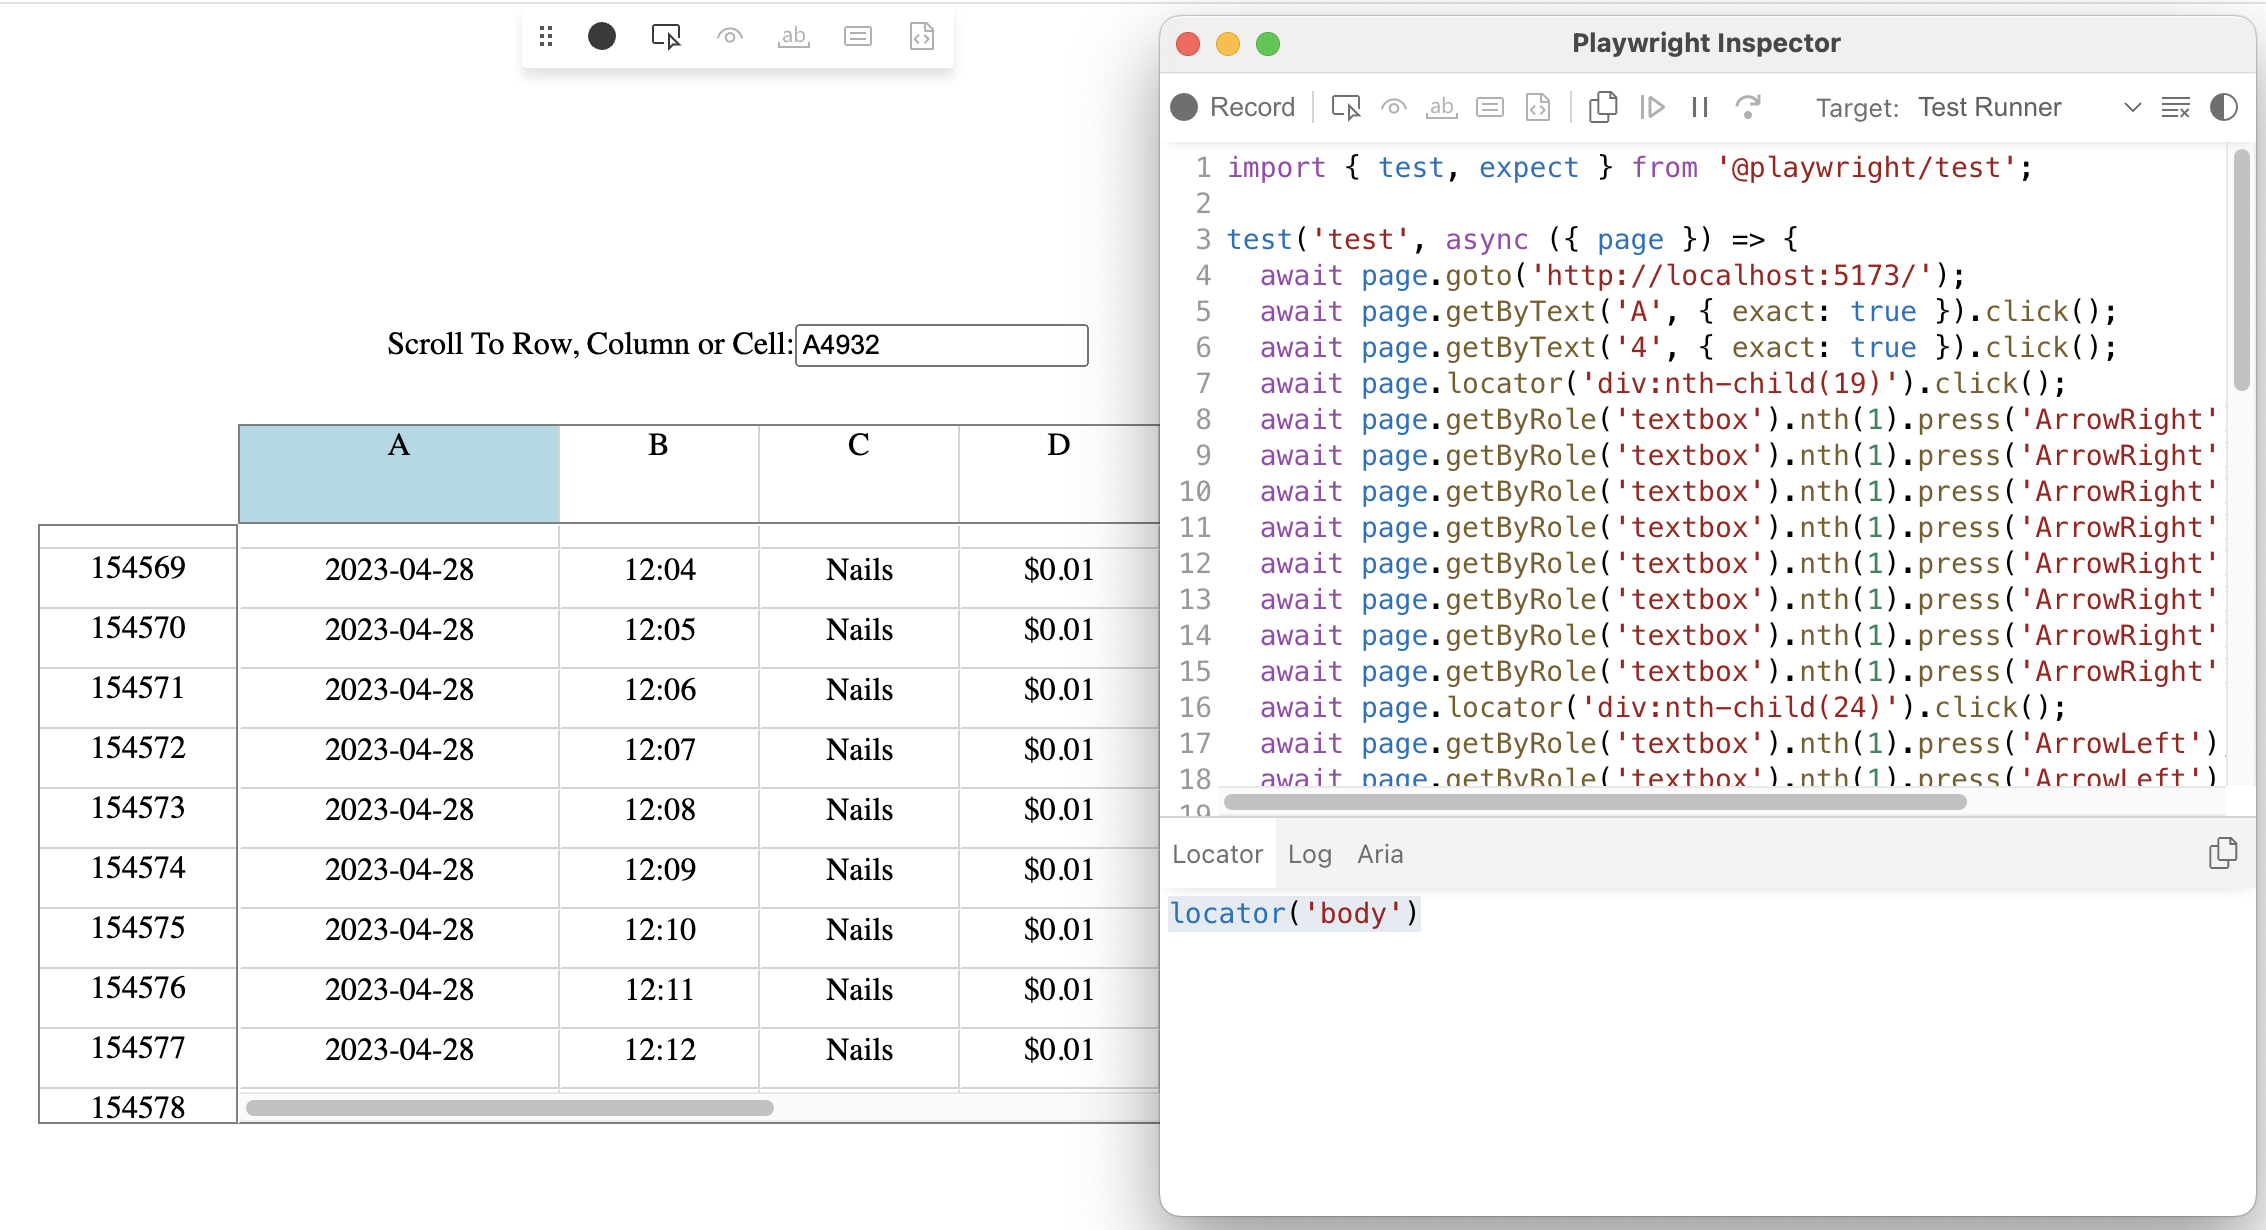
Playwright includes a handy codegen utility if, like me, you’re unsure of the best locator to use for an element. I fired up my spreadsheet sample app and ran npx playwright codegen http:/localhost:5173.


Codegen adds a toolbar and floating palette to the app under test. You can hover over elements in the page and see a suggested locator or record an interactive session and generate actions that you can copy into your test.
It immediately became clear that most of the elements on my page don’t have good locators. Which also implies that they’re not very accessible.
The input fields should be easy to sort out. I’ve noticed some warnings in Chrome developer tools that I need either a name or id for autofill to work. I don’t like adding ids to elements within components as ids need to be unique for the entire page. The app should decide what ids, if any, are used. So, names it is.
Accessible Name
I gave my input box a name of “name” as it displays the name of a row, column or cell. I tried using getByRole('textbox', { name: 'name'}) as a locator but it didn’t match anything.
It turns out that the accessible name for an input doesn’t come from the name attribute. There’s a list of places where accessibility APIs look, including the title attribute. Which didn’t work either. The only thing that worked for me was the aria-label attribute.
I can lookup an element by title directly using the getByTitle locator, so I went with that. Accessibility is a whole topic on its own, so happy to leave it for another time. Setting a title gives my text box a handy tooltip too. I left the name attribute in place to shut up the Chrome warnings.
Accessing Rows, Columns and Cells
Spreadsheet cells in the grid and headers are more tricky. I don’t really want to add a title to each cell. It doesn’t add any value to the app.
In the end I realized that locating specific cells isn’t that useful. I can locate the header cell for row 5000 but what can I do with it? Check that the text it contains is “5000”? I can do that in a unit test. Testing at this level of the pyramid should be about browser events and layout, things I can’t do at unit test level.
I thought about the bugs that motivated use of Playwright. I used the “Scroll To” input field to select row 5000 and found that the grid jumped to row 8211 instead. Let’s write a test case that confirms the problem is fixed.
The test needs to put “5000” into the input field, press enter and then check that the selected row in the row header contains “5000”. I need to be able to locate elements by their semantic class (row, column, cell, focus, selection, etc.) and how they’re placed in the grid.
Despite being at the bottom of the priority list in the Playwright documentation, CSS locators seem like the best fit. Playwright recommends prioritizing user-visible locators because CSS is an implementation detail that could break when the app is updated.
In my case, CSS classes are part of the contract between component and app. They’re semantically meaningful, describing the visual state of the component.
CSS class based selectors can be easily combined with layout based queries (e.g. the cell to the right of the focus cell) and DOM structure based queries (e.g. the first row in the row header).
The only problem is that my sample app currently uses CSS Modules which makes CSS class names dynamic. Fortunately, my approach to CSS means that the app is in control and it’s easy to switch to fixed class names.
First Test
After that long preamble, here’s what my first test looks like.
test.beforeEach(async ({ page }) => {
  await page.goto('/');
});

test('Scroll to row 5000', async ({ page }) => {
  const name = page.getByTitle('Name');
  await name.click();
  await name.fill('5000');
  await name.press('Enter');

  const row = page.locator('.VirtualSpreadsheet_Row__Selected');
  await expect(row).toHaveText('5000');
});
I’m happy. It’s concise and very readable.
Developer Experience
Codegen is a great tool to help you get started. Record an interaction with your app. Copy the generated test code and paste it into your test as a starting point that you then refine. Get recommendations for locators to use, or try out your own ideas and see the corresponding elements highlighted.
The VS Code extension is even better. You can record interactions directly into your source code. Run your test direct from the VS Code editor with the option to pop up a browser to see what’s happening. As you edit locators, the corresponding elements are highlighted in the browser.
The webServer option in the Playwright config file lets you specify how to start a local dev server. In my case it’s npm run dev. I’m using Vite, which defaults to port 5173 for dev.
{
  webServer: {
     command: 'npm run dev',
     url: 'http://localhost:5173/',
     reuseExistingServer: !process.env.CI
  }
}
Running npx playwright test on the command line will start the server, run the tests and shut it down when done.
Setting the reuseExistingServer option means Playwright will use any existing server running on the specified port rather than trying and failing to start a new one. This is great for local development. If you have a dev server you started manually, Playwright will use that. If you haven’t, no worries, it’ll run one for you. Note the use of process.env.CI to use more conservative settings in a CI environment.
The VS Code extension works the same way. However, it leaves any server it started running until VS Code exits. If you need to force quit a dev server, then npx kill-port 5173 will do the trick.
GitHub Actions
Playwright is a keeper, so I want to finish by including Playwright test runs in my GitHub Actions Build CI workflow.
There’s a dedicated section in the manual for setting this up. If you have an existing workflow, you’ll need to add two extra lines. The all important - run: npx playwright install --with-deps after your existing npm ci, plus whatever you use to run playwright for each project.
For my monorepo, it’s npx lerna run playwright where each project with Playwright tests has the script "playwright": "npx playwright test" in it’s package.json.
You can also tweak your playwright configuration to distinguish between CI and your local dev environment. I’m using the recommended CI specific settings.
export default defineConfig({
  /* Fail the build on CI if you accidentally left test.only in the source code. */
  forbidOnly: !!process.env.CI,

  /* Retry on CI only */
  retries: process.env.CI ? 2 : 0,

  /* Opt out of parallel tests on CI. */
  workers: process.env.CI ? 1 : undefined,

  /* Reporter to use. Concise 'dot' for CI,  full 'list' when running locally */
  reporter: process.env.CI ? 'dot' : 'list'
})
Next Time
We have the extremes of the testing pyramid covered. Vitest for unit testing and Playwright for end to end testing. Next time, we’ll look at solutions for the middle of the testing pyramid.